

|
|
|
|
 |

|
 |
BMW Garage | BMW Meets | Register | Today's Posts | Search |
 |

|
BMW 3-Series (E90 E92) Forum
>
Dakota Beige Interior Refinishing
|
 |
| 08-30-2013, 10:11 PM | #1 |
|
Fuck it dude, let's go bowling.
888
Rep 2,480
Posts |
Dakota Beige Interior Refinishing
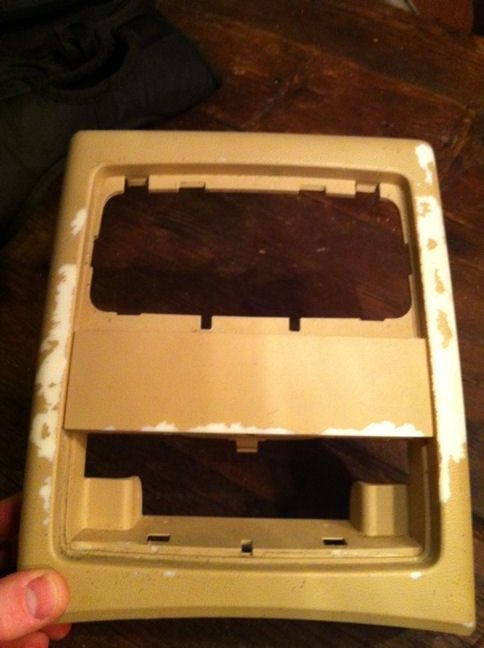 Post DIY edit - this is a FAIL. I tried two techniques and was unable to get it right. I've seen others do it well, but not with Dakota Beige. I'm leaving the DIY up so others can learn from it. This DIY covers the panel removal, preparation, painting and replacement. I started this project with two resources. The first resource is this DIY: http://www.e90post.com/forums/showthread.php?t=29773 The DIY makes the panel removal seem very simple, which it really isn't. Notice that there are 15 pages of comments. Most are of the "Great Job!" variety. But toward the end I see some folks talking about how removal of the panel isn't quite so easy. I suspect that most people were breaking the plastic cleats that lock the panel to the console (like I did) and not even realizing it. The second resource is post #14 from the following thread.... http://forums.bimmerforums.com/forum...9#post25747919 That post gives you a sense of how good this can come out - the guy did a great job. Fortunately for him, the color match for gray was very close, even using auto store pre-mixed colors. For the paint, online chip samples don't help much, so I went to a local automotive paint supplier. I used my OBD panel to match the color. The paint products are made by SEM. The paint is called Color Coat Flexible Coating. I bought 15143 Sandstone, which was the closest match I could find for Dakota Beige. I also used 38353 Plastic & Leather Prep and 38363 "Sand Free"- I bought these online from Summit Racing. 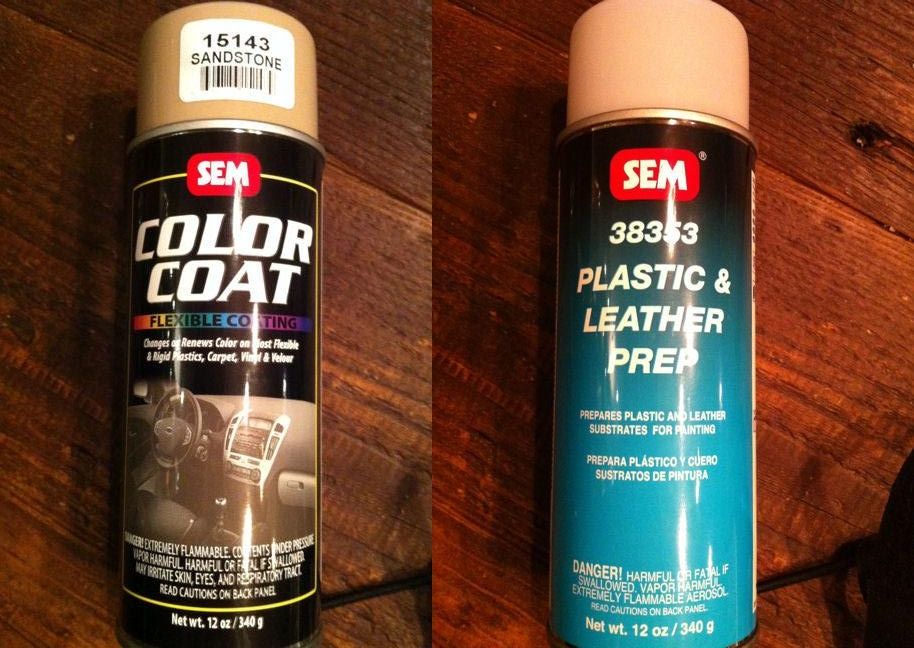 Here's a link to their product page - on there you'll find a video that describes the process for using these products. I spent about $40 total on the three products. In reality, you could probably just buy the paint and get by without the other two products - just use stuff you have around the house, like some kind of solvent to clean the console, and then scuff it up with steel wool or sandpaper. Seems like it would work. To remove the panel, first start with the top. There are two tabs that hold this in place. They break free very easily. Sitting in the back seat, all I did was grab the two upper corners and pull toward me. If you have difficulty, here's the orientation of the tabs: 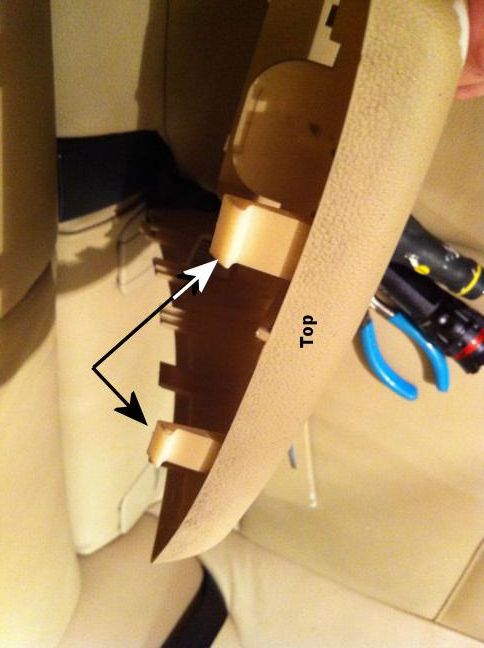 Once those tabs are loose, the panel will tilt forward, but the base will still be locked tight into the console. Here's where things get tricky. All along the side of the panel are guide tabs and *very* small and easy locking cleats. - as illustrated here:  The side cleats are easy - you can just pull to release them. But at the very bottom are two slotted tabs - one on each side - these are a nightmare. The slots in these tabs lock onto cleats in the console. If your car is anything like mine, you can pull and push every which way it it will not budge one iota. I didn't have the benefit of the photo above, so I didn't really know what I was dealing with. In the end, I wound up breaking the cleats to release the tabs. I'm not sure it will matter - we'll see. But just knowing how it's all held together should help you do a better job than I did. Once I had the panel loose, there is one wire that connects to the A/C controls. It is not exactly easy to unplug because the male end of the coupling has a gnarly nipple (or cleat) that keeps if from being pulled apart. You cannot get to the cleat of course, and in fact the entire coupling is not really designed to be pulled apart at all. Here are pictures of both ends of the coupling: 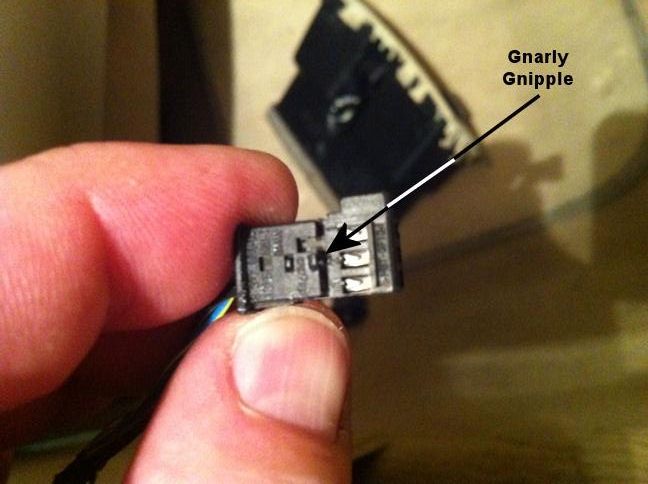  The second picture above shows how the female coupling is locked into a tab frame. Knowing this, you can easily wrest the coupling out of the frame to get some slack that affords better access to get them apart. With the wire coupling separated, the panel is completely free. Now it's time to remove the ashtray frame and the A/C cluster. Looking at the back of the console piece, this should be very intuitive - so intuitive that I did not take pictures. The DIY link above has some pictures if you get stuck, but it's just a few tabs that need to be gently pried. With those two items out, you're left with just the rear console frame, ready for paint. Unfortunately for me, the ashtray cover was also chipped, so I needed to go one step further and remove that for painting. The ashtray cover is held to the ashtray frame by... you guessed it: tabs. Here I use a flathead screwdriver to pry them loose: 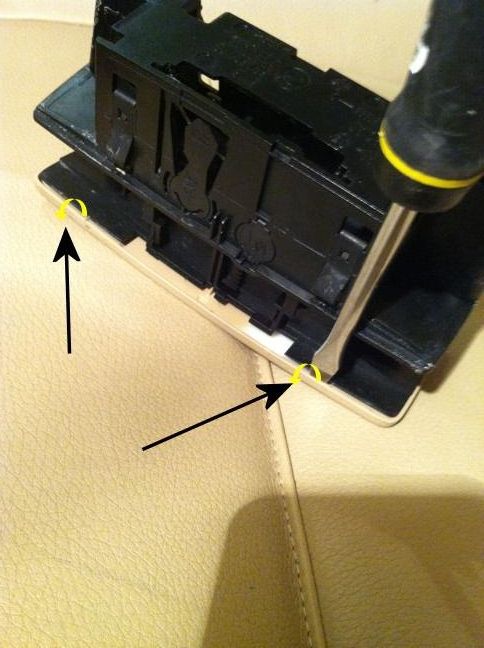 The photos below should help you understand how they're put together, which is really all you need to get them apart. First, the frame: 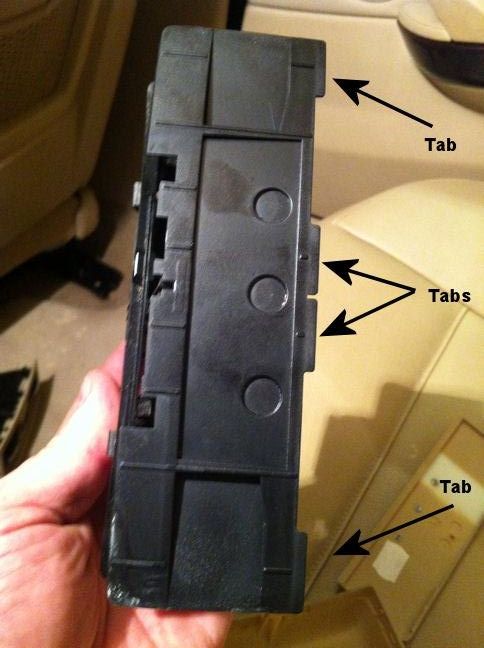 Next, the cover: 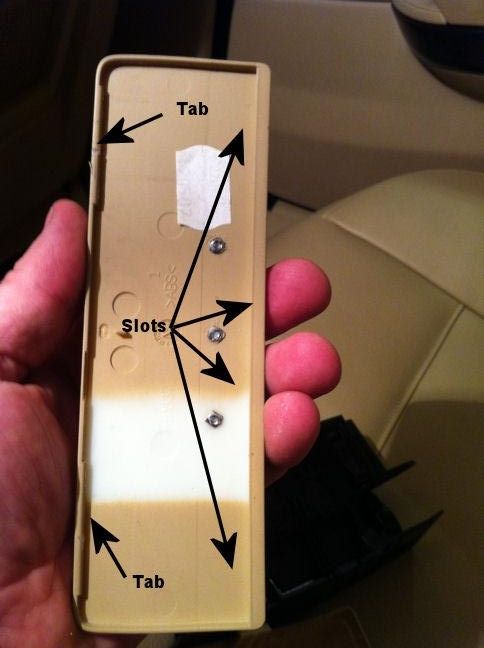 You can see the the tabs from the frame fit into the slots from the cover, and then by pressing the other side of the cover onto the frame it all snaps together. At this point, you should have all the console panel pieces removed for painting. I went ahead with the painting, and the SEM paint color was a complete mismatch for Dakota Beige. I contacted SEM and they said they could custom-make the color, but it seemed expensive. They essentially "cook up" the color match at the factory, then send the specs to your local jobber. The local jobber mixes up a quart and you have to figure out how to apply it. They recommend a sprayer with a 1.3 or 1.4 tip. Next I ordered 16oz of leather dye from Leatherique using the OEM color code (which I found on a build-sheet located under the rear seat). That was not even close, as you can see from the bottle comparisons below. Too light and too beige with not enough red. Next I removed the rear seat again in order to get a very small (1"x1") sample to send to Leatherique for a custom mix. Trust me, there is *very little* excess leather in these cars, and it's a struggle to find a sample swatch. Anyway, they did the custom color match, and it wasn't close. Again, too light and too beige with not enough red. Here's a photo of the two Leatherique batches I ordered (on the left is the second batch of custom-mixed color based on my sample swatch, and on the right is the first batch I ordered just using the OEM color code). 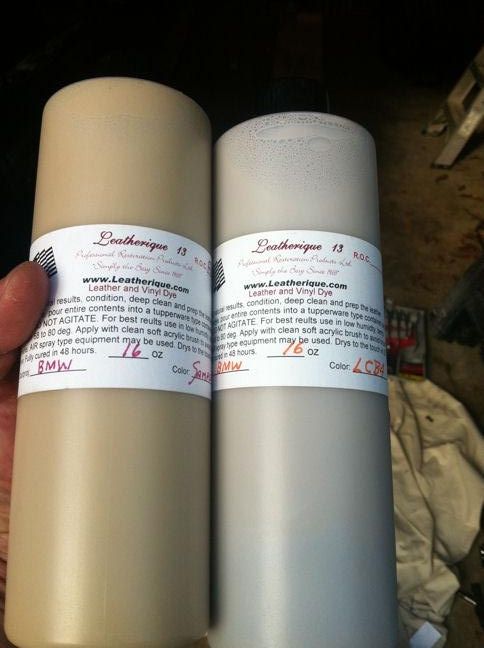 And here is the result using the second batch - the closer of the two colors. I know the color looks closer to the first batch, but it must be the lighting. 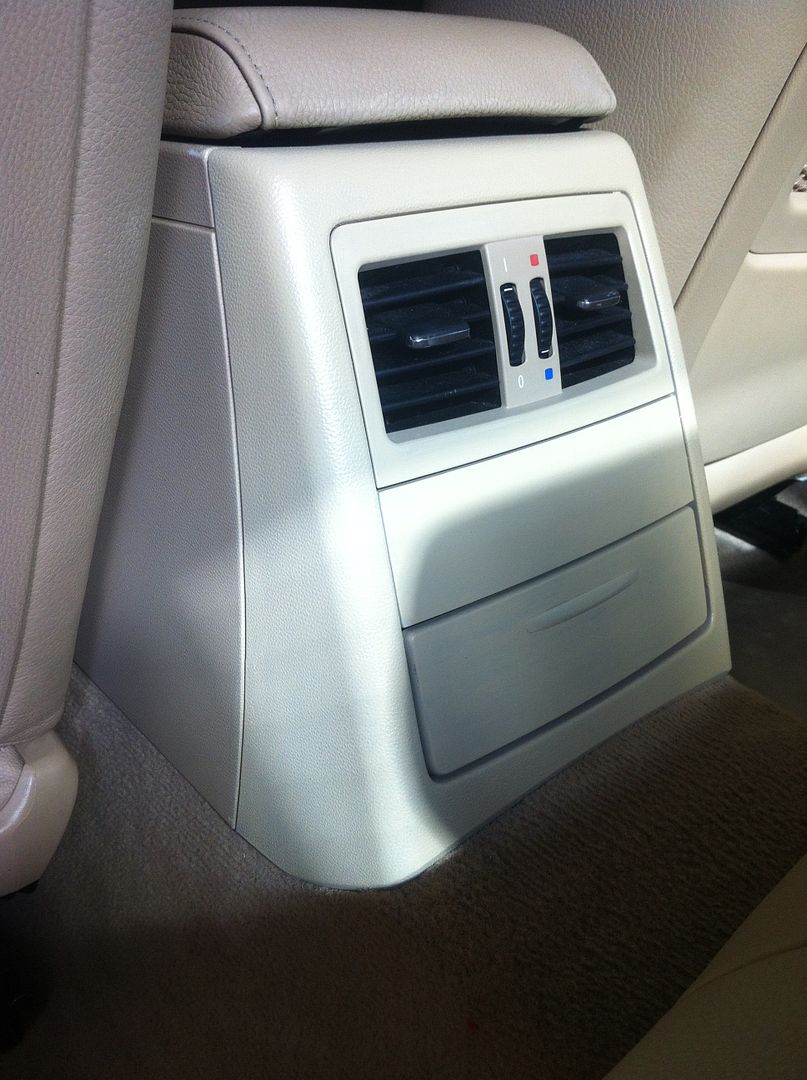 (note - I haven't taken the painter's tape off the silver trim piece in this photo) I emailed Leatherique and they suggested pouring all the dye out into a container and giving it a good stir. That did not work. I returned the dye to them along with a larger piece of my interior (seat trim). They adjusted the color for free and returned it to me along with the interior piece. I can't show the difference between the two mixes because they actually adjusted the original mix and sent the same bottle back to me. But here is the result. Again, not even close.  So the bottom line is, it does not appear possible to get a good, professional result for DIY refinishing of Dakota Beige. As someone comments below, the replacements parts are not overly expensive. I knew that going in, but hoped to find a way to refinish successfully.
__________________
1M. Previously: '13 135is; '07 E90 335i; '02 325i; '99 Z3; '98 328is; '87 L6; '77 320i
 Last edited by NGEE; 02-22-2014 at 06:07 PM.. |
| 09-02-2013, 02:59 PM | #2 |
|
BMW FTW!

16
Rep 82
Posts |
Hey I just finished completing this same project on my e90. I see you bought some spray paint to use and I wanted to point out another option.
I'm not sure how close that spray paint is to the dakota beige color...but what I did was take the trim piece that surrounds the cup holders off and took that to Home Depot. I had them use there color match machine to get a perfect match. I purchased the "sample size" for 4 bucks and then bought a clear coat spray paint. Because the paint isnt designed for plastic, thats why I used a clear coat spray to finish it off...here are some pics. Good luck with the project, its another option if you are not happy with the spray paint color. Its pretty close to the dakota beige... 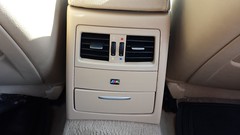 Dakota Beige e90 3series color match interior touch up by richouston24, on Flickr  Dakota Beige e90 3series color match interior touch up by richouston24, on Flickr
__________________
2007 328i e90 w/ Premium Package
- 18" BMW OEM Type 124 Rims  |
|
Appreciate
0
|
| 09-02-2013, 07:40 PM | #3 | |
|
Fuck it dude, let's go bowling.
888
Rep 2,480
Posts |
Quote:
Two questions - 1 - How did you spray? Did you purchase non-aerosol paint and then use your own sprayer? 2 - Did you have any difficulties removing the panel?
__________________
1M. Previously: '13 135is; '07 E90 335i; '02 325i; '99 Z3; '98 328is; '87 L6; '77 320i
|
|
|
Appreciate
0
|
| 09-02-2013, 08:02 PM | #4 | |
|
BMW FTW!
16
Rep 82
Posts |
Quote:
Good luck with the rest of the project!
__________________
2007 328i e90 w/ Premium Package
- 18" BMW OEM Type 124 Rims |
|
|
Appreciate
0
|
| 09-02-2013, 08:11 PM | #5 | |
|
Fuck it dude, let's go bowling.
888
Rep 2,480
Posts |
Quote:
__________________
1M. Previously: '13 135is; '07 E90 335i; '02 325i; '99 Z3; '98 328is; '87 L6; '77 320i
|
|
|
Appreciate
0
|
| 09-04-2013, 02:08 PM | #6 |
|
Fuck it dude, let's go bowling.
888
Rep 2,480
Posts |
So here's an interesting thing. In researching interior color codes, I discovered that if you lift up your back seat you'll find a build sheet for your car. That sheet contains the interior color code. Here's mine below. It appears that Dakota Beige is OEM color code LCB4. I ordered from Leatherique using that code - we'll see what happens.
Notice that I can also see my build date - 6/1/2007 at 10:17 pm! Also, looks possible that our cars share the seat carrier (träger, or beam) with an E87. 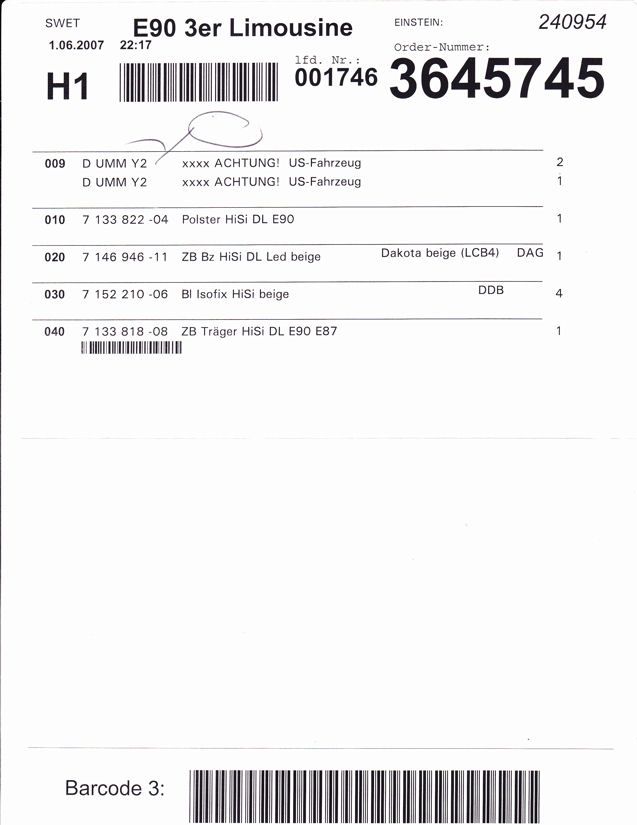
__________________
1M. Previously: '13 135is; '07 E90 335i; '02 325i; '99 Z3; '98 328is; '87 L6; '77 320i
Last edited by NGEE; 02-13-2014 at 01:26 PM.. |
|
Appreciate
0
|
| 02-13-2014, 05:20 AM | #7 |
|
Lieutenant Colonel
 
45
Rep 1,511
Posts
Drives: 2014 i3 BEV
Join Date: Aug 2006
Location: Guelph, Ontario
|
The replacement rear console was around $15. Might be an option for some readers.
__________________
OMG! Born Electric 10/17/2018!
2014 I01 i3 BEV 2011 E91 328i xDRIVE TOURING | 2010 F83 X3 3.0i xDRIVE | 2006 E90 330i 6MT (Ret) Last edited by tman; 02-22-2014 at 06:41 PM.. |
|
Appreciate
0
|
| 02-13-2014, 06:49 AM | #8 | |
|
Fuck it dude, let's go bowling.
888
Rep 2,480
Posts |
Quote:
__________________
1M. Previously: '13 135is; '07 E90 335i; '02 325i; '99 Z3; '98 328is; '87 L6; '77 320i
|
|
|
Appreciate
0
|
| 02-13-2014, 06:59 AM | #9 |
|
Lieutenant Colonel
45
Rep 1,511
Posts
Drives: 2014 i3 BEV
Join Date: Aug 2006
Location: Guelph, Ontario
|
I didn't need all the parts, just the main rear housing which was $14.31 plus tax (got the part from getbmwparts.com, part # 51167145683). Looks great!
__________________
OMG! Born Electric 10/17/2018!
2014 I01 i3 BEV 2011 E91 328i xDRIVE TOURING | 2010 F83 X3 3.0i xDRIVE | 2006 E90 330i 6MT (Ret) |
|
Appreciate
0
|
| 07-15-2014, 07:05 PM | #10 | |
|
New Member
3
Rep 18
Posts |
Quote:
|
|
|
Appreciate
0
|
| 07-15-2014, 07:30 PM | #11 | ||
|
Save The Manuals!
64
Rep 491
Posts |
Quote:
 , which is why I used the epoxy fix. How did you hold it in place without the cleats? , which is why I used the epoxy fix. How did you hold it in place without the cleats? Quote:
__________________
 2008 E91 36K, 6-speed, RWD, Alpine, Terra, Xenons, ZSP, ZCW, ZPP, PDC, CA, alarm, M shifter and M brake handle, Euro rear fog light switch, Euro aspheric mirrors, rear power outlets, Euro split armrest, Lidatek, remote V-1, Cocomats, beach sand, $10 clutch stop mod. 1998 Volvo V70T5 226K, 5-speed, original clutch (third clutch pedal!), aspheric driver's mirror, E-code headlights, IPD sway bar, strut tower brace & skidplate. 2008 E91 36K, 6-speed, RWD, Alpine, Terra, Xenons, ZSP, ZCW, ZPP, PDC, CA, alarm, M shifter and M brake handle, Euro rear fog light switch, Euro aspheric mirrors, rear power outlets, Euro split armrest, Lidatek, remote V-1, Cocomats, beach sand, $10 clutch stop mod. 1998 Volvo V70T5 226K, 5-speed, original clutch (third clutch pedal!), aspheric driver's mirror, E-code headlights, IPD sway bar, strut tower brace & skidplate. |
||
|
Appreciate
0
|
 |
| Bookmarks |
|
|


