E90Post


The Tire Rack
 
BMW 3-Series (E90 E92) Forum > BMW E90/E92/E93 3-series General Forums > Photo/Video/Media Gallery > Detailed


Reply
 
Thread Tools Search this Thread
      05-10-2015, 07:25 AM   #1
SHEEDI
Banned
United_States
602
Rep
2,703
Posts

Drives: 2009 335i - Sport PKG
Join Date: Jun 2009
Location: NY

iTrader: (0)

Garage List
2009 BMW 335i  [8.50]
Detailed

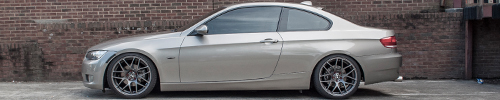
Spring Detailing, enjoy Pics
Attached Images
              

Last edited by SHEEDI; 05-10-2015 at 12:04 PM..
Appreciate 0
      05-10-2015, 07:35 AM   #2
wdeerfield
A family of bimmers
United_States
2748
Rep
7,742
Posts

Drives: '18 G01 X3M40i
Join Date: Jan 2012
Location: Clifton Park, NY

iTrader: (0)

looks great! what was your process? i just completed a correction with m205 followed up with nxt 2.0. i've never seen color matched rain rails.
__________________
2018 PB/Black G01 X3M40i | 699M | ZDA | ZPP | ZPX | Maxton front lip | X3M vents | 15mm Spacers | Diamond G20 style grills
Appreciate 0
      05-10-2015, 12:45 PM   #3
Dylanize
Captain Dutch Rudder
Dylanize's Avatar
204
Rep
2,258
Posts

Drives: AMG
Join Date: Jan 2013
Location: Charlotte, NC

iTrader: (8)

All that AND NO FULL CAR PIC!?

Looks great though.
__________________
No more E92 or E82
Appreciate 1
      05-10-2015, 05:51 PM   #4
SHEEDI
Banned
United_States
602
Rep
2,703
Posts

Drives: 2009 335i - Sport PKG
Join Date: Jun 2009
Location: NY

iTrader: (0)

Garage List
2009 BMW 335i  [8.50]
Quote:
Originally Posted by Dylanize View Post
All that AND NO FULL CAR PIC!?

Looks great though.
here it is
Attached Images
 
Appreciate 0
      05-10-2015, 06:12 PM   #5
SHEEDI
Banned
United_States
602
Rep
2,703
Posts

Drives: 2009 335i - Sport PKG
Join Date: Jun 2009
Location: NY

iTrader: (0)

Garage List
2009 BMW 335i  [8.50]
Quote:
Originally Posted by wdeerfield View Post
looks great! what was your process? i just completed a correction with m205 followed up with nxt 2.0. i've never seen color matched rain rails.

Cleaned RIMS with Sonax full effect
tires and wheel wells with Chemical guys orange signature degreaser
engine bay with Chemical guys orange signature degreaser
dried engine bay with towel
degreased and washed undercarriage with Chemical guys orange signature degreaser
Exhaust Tips polished with Borla Exhaust Polish
washed with carpro Reset car wash
ONR with claybar
washed again with carpro wash
dried with towels
dried wheels with towels
engine protected with carpro Perl
Front Grills and front bumper black plastic trim pieces protected with carpro Perl
Tires dressed with Carpro Perl
Paint protected with Carpro reload " I had applied carpro UK 6 months ago"

I still had to apply carpro Perl to other trim pieces but I was tired and wanted to go rest
I will cover other things in next wash, by the way there was no paint correction involved, didn't need to polish the car

Last edited by SHEEDI; 05-11-2015 at 10:56 AM..
Appreciate 2
      05-10-2015, 06:14 PM   #6
Blindside_137
Lieutenant General
Blindside_137's Avatar
United_States
6713
Rep
10,599
Posts

Drives: 2011.75 SSII E90 M3 ZCP
Join Date: Jun 2010
Location: Raleigh, NC

iTrader: (2)

very nice! mine next please thank you
Appreciate 0
      05-10-2015, 06:30 PM   #7
SHEEDI
Banned
United_States
602
Rep
2,703
Posts

Drives: 2009 335i - Sport PKG
Join Date: Jun 2009
Location: NY

iTrader: (0)

Garage List
2009 BMW 335i  [8.50]
Quote:
Originally Posted by Blindside_137 View Post
very nice! mine next please thank you
Appreciate 0
      05-11-2015, 07:59 AM   #8
BeastMode335i
Maximus Decimus Meridius
BeastMode335i's Avatar
United_States
1130
Rep
4,584
Posts

Drives: F30 335i
Join Date: Apr 2014
Location: Down South

iTrader: (2)

Exhaust tips looks nice! That Borla stuff did a good job!
__________________
F30 335i
Melbourne Red Metallic
M-Sport Package
Appreciate 0
      05-11-2015, 08:49 AM   #9
SHEEDI
Banned
United_States
602
Rep
2,703
Posts

Drives: 2009 335i - Sport PKG
Join Date: Jun 2009
Location: NY

iTrader: (0)

Garage List
2009 BMW 335i  [8.50]
Quote:
Originally Posted by wdeerfield View Post
looks great! what was your process? i just completed a correction with m205 followed up with nxt 2.0. i've never seen color matched rain rails.
I see you have front splitters, that's my next mod, I have splitters waiting in my closet
Appreciate 0
      05-11-2015, 08:51 AM   #10
Euroboost91
Private First Class
Euroboost91's Avatar
Russian Federation
57
Rep
170
Posts

Drives: 2011 BMW 335i
Join Date: Apr 2011
Location: Lake Worth, FL

iTrader: (1)

Looks fantastic!
__________________
2011 E90 335i LCI 6MT | Bagged |
IG: rrs_simplee90
Appreciate 0
      05-11-2015, 09:54 AM   #11
wdeerfield
A family of bimmers
United_States
2748
Rep
7,742
Posts

Drives: '18 G01 X3M40i
Join Date: Jan 2012
Location: Clifton Park, NY

iTrader: (0)

Quote:
Originally Posted by SHEEDI View Post

I will cover other things in next wash, by the way there was no paint correction involved, didn't need to polish the car
Thats an extensive list! well done!! car looks awesome. mine didnt need it that badly, i used a light cut pad to just remove some swirling. Ill have to look into the sonax and carpro products. Seems they worked well for you.
__________________
2018 PB/Black G01 X3M40i | 699M | ZDA | ZPP | ZPX | Maxton front lip | X3M vents | 15mm Spacers | Diamond G20 style grills
Appreciate 0
      05-12-2015, 08:09 AM   #12
SHEEDI
Banned
United_States
602
Rep
2,703
Posts

Drives: 2009 335i - Sport PKG
Join Date: Jun 2009
Location: NY

iTrader: (0)

Garage List
2009 BMW 335i  [8.50]
Quote:
Originally Posted by wdeerfield View Post
looks great! what was your process? i just completed a correction with m205 followed up with nxt 2.0. i've never seen color matched rain rails.
by the way how did you get those splitters installed, what steps/process was involved?
I have mine waiting in closet.
Appreciate 0
      05-12-2015, 08:41 AM   #13
wdeerfield
A family of bimmers
United_States
2748
Rep
7,742
Posts

Drives: '18 G01 X3M40i
Join Date: Jan 2012
Location: Clifton Park, NY

iTrader: (0)

Quote:
Originally Posted by SHEEDI View Post
by the way how did you get those splitters installed, what steps/process was involved?
I have mine waiting in closet.
Initially i used the two screws in the bottom to mock it up. I then used painters tape to outline where i wanted them. I made sure to clean the backside of the splitter and the bumper really well with rubbing alcohol. I placed the 3m tape on the bumper about 1/8" below the tape line (this is because the splitters have a slight lip to them and you dont want to see the tape) Alternatively, you could apply the tape the splitter, not sure why i did the opposite. i started from the wheel well opening to "hook" the splitter on the corner correctly and to make sure it sat in the groove on the bumper at the top of the splitter. I then slowly "rolled' the splitter into place pressing firmly along the way. I then used painters tape to hold it in place. I also put 3m on the bottom of the bumper as well. After, i secured with the OEM screws in the bottom. This took some effort to get them to thread as the splitter increased the space between the screw and the clip it screws into. I would suggest trying to find a longer screw similar to the OEM screw.

Cant remember if i told you or not, but definitely cover these splitters with 3m clear vinyl protectant. mine look like crap at that bottom edge. so bad that i put a thin strip of black vinyl (aka electrical tape) to hide the issue until i install the second set i have waiting.
__________________
2018 PB/Black G01 X3M40i | 699M | ZDA | ZPP | ZPX | Maxton front lip | X3M vents | 15mm Spacers | Diamond G20 style grills
Appreciate 0
      05-12-2015, 01:30 PM   #14
Olagüe
Brigadier General
Olagüe's Avatar
Spain
106
Rep
4,502
Posts

Drives: 333i e92
Join Date: Aug 2007
Location: New York City

iTrader: (0)

nice car!
Appreciate 0
      05-12-2015, 03:30 PM   #15
Soles330i
Private First Class
United_States
15
Rep
136
Posts

Drives: 06 330i
Join Date: Feb 2015
Location: San Diego

iTrader: (0)

i have to do my engine bay so bad...

nice work!
Appreciate 0
      05-12-2015, 07:33 PM   #16
SHEEDI
Banned
United_States
602
Rep
2,703
Posts

Drives: 2009 335i - Sport PKG
Join Date: Jun 2009
Location: NY

iTrader: (0)

Garage List
2009 BMW 335i  [8.50]
Thank you guys
Appreciate 0
      05-12-2015, 07:35 PM   #17
Eat.Sleep.Race
Out Boosting...
United_States
243
Rep
3,987
Posts

Drives: F30 335i M-Sport
Join Date: Feb 2014
Location: Northern VA

iTrader: (7)

Nice N clean!!!!
__________________
Alpine White M-Sport F30
Appreciate 0
      05-15-2015, 11:01 PM   #18
SHEEDI
Banned
United_States
602
Rep
2,703
Posts

Drives: 2009 335i - Sport PKG
Join Date: Jun 2009
Location: NY

iTrader: (0)

Garage List
2009 BMW 335i  [8.50]
Quote:
Originally Posted by Olagüe View Post
nice car!
Thanks
Appreciate 0
      05-15-2015, 11:01 PM   #19
SHEEDI
Banned
United_States
602
Rep
2,703
Posts

Drives: 2009 335i - Sport PKG
Join Date: Jun 2009
Location: NY

iTrader: (0)

Garage List
2009 BMW 335i  [8.50]
Quote:
Originally Posted by Soles330i View Post
i have to do my engine bay so bad...

nice work!
Make sure you cover the starter
Appreciate 0
      05-15-2015, 11:04 PM   #20
SHEEDI
Banned
United_States
602
Rep
2,703
Posts

Drives: 2009 335i - Sport PKG
Join Date: Jun 2009
Location: NY

iTrader: (0)

Garage List
2009 BMW 335i  [8.50]
Quote:
Originally Posted by wdeerfield View Post
Initially i used the two screws in the bottom to mock it up. I then used painters tape to outline where i wanted them. I made sure to clean the backside of the splitter and the bumper really well with rubbing alcohol. I placed the 3m tape on the bumper about 1/8" below the tape line (this is because the splitters have a slight lip to them and you dont want to see the tape) Alternatively, you could apply the tape the splitter, not sure why i did the opposite. i started from the wheel well opening to "hook" the splitter on the corner correctly and to make sure it sat in the groove on the bumper at the top of the splitter. I then slowly "rolled' the splitter into place pressing firmly along the way. I then used painters tape to hold it in place. I also put 3m on the bottom of the bumper as well. After, i secured with the OEM screws in the bottom. This took some effort to get them to thread as the splitter increased the space between the screw and the clip it screws into. I would suggest trying to find a longer screw similar to the OEM screw.

Cant remember if i told you or not, but definitely cover these splitters with 3m clear vinyl protectant. mine look like crap at that bottom edge. so bad that i put a thin strip of black vinyl (aka electrical tape) to hide the issue until i install the second set i have waiting.
Thanks for the tips,. I am going to cover them with 3M this weekend
will post pics after
Appreciate 0
      05-18-2015, 08:42 AM   #21
BAL278
Major
BAL278's Avatar
48
Rep
1,010
Posts

Drives: E92 335xi JB
Join Date: Jun 2011
Location: North NJ

iTrader: (3)

CLEAN
__________________

2008 335xi Jet Black//Coral Red
VTT Stage 1+// Procede V5//VRSF DPs//AMS FMIC//KW V1//M3 Sways & Sub Bushings// Alpina AT flash
Apex EC-7//Michelin PSS//Dinan CAI
Appreciate 0
      05-18-2015, 04:30 PM   #22
BoogeyMan'sBMW
Lieutenant Colonel
BoogeyMan'sBMW's Avatar
Bangladesh
118
Rep
1,933
Posts

Drives: SLOW
Join Date: Jun 2009
Location: Queens NY

iTrader: (4)

Can you do mine next? I shall make payments in samosas and kashmiri chai.

Let me know when I am up, thanks
Appreciate 0
Reply

Bookmarks


Posting Rules
You may not post new threads
You may not post replies
You may not post attachments
You may not edit your posts

BB code is On
Smilies are On
[IMG] code is On
HTML code is Off


All times are GMT -5. The time now is 06:42 AM.


e90post
Powered by vBulletin® Version 3.8.11
Copyright ©2000 - 2024, vBulletin Solutions Inc.
1Addicts.com, BIMMERPOST.com, E90Post.com, F30Post.com, M3Post.com, ZPost.com, 5Post.com, 6Post.com, 7Post.com, XBimmers.com logo and trademark are properties of BIMMERPOST