
 |
|
 |

|
|
|
| 07-16-2010, 11:41 AM | #1 |
|
Brigadier General
 
324
Rep 3,882
Posts |
2008 E92 M3 V1 Hardwire (Fusetap method)
Seeing that it's come up in conversation a few times lately, I've decided to put my DIY back on M3post and keep it up, so long as certain people don't start going absolutely bat shit crazy again.
Edit: I've incorporated some minor updates into the DIY guide. Last edited by LateBraking; 07-16-2010 at 11:56 AM.. |
| 07-16-2010, 11:42 AM | #2 |
|
Brigadier General
324
Rep 3,882
Posts |
WARNING: I take no responsibility for anything that happens.
THIS GUIDE IS WRITTEN FOR A MY08 E92 BMW M3. IT MAY WORK ON OTHER MODELS AND YEARS, IT MAY NOT. USE AT YOUR OWN RISK. Edit: I have used this method on my 2011.5 M3 with no issues thus far. Take it for what it's worth, but I still take no responsibility for anything that may go wrong. Special Thanks and credit goes to picus, bilbarstow, and E92Vancouver from E90post.com, for providing photographs much better than mine. I apologize for the terrible iPhone pictures and the hastily written instructions. Trust me though, this is much easier than it looks. What you will need. *MINI*-Fuse tap kit (got mine from Autozone). Low Amp *MINI* fuse (mine was 3 amps, from Radioshack). Two flat head screwdrivers. T-30 Torx Wrench (6-point star-shape). Needle nose pliers. Everything that comes in a *Brand-New* V1 kit (Not going to hold your hand on this if you got yours used). Garage/Work space. Laptop or printed instructions. Patience. Beer (optional). Start by getting all your stuff together, and having your instructions handy. Helps to have a nice, wide open, and well-lit place to work. (I neglected this last part, shouldn't have.) 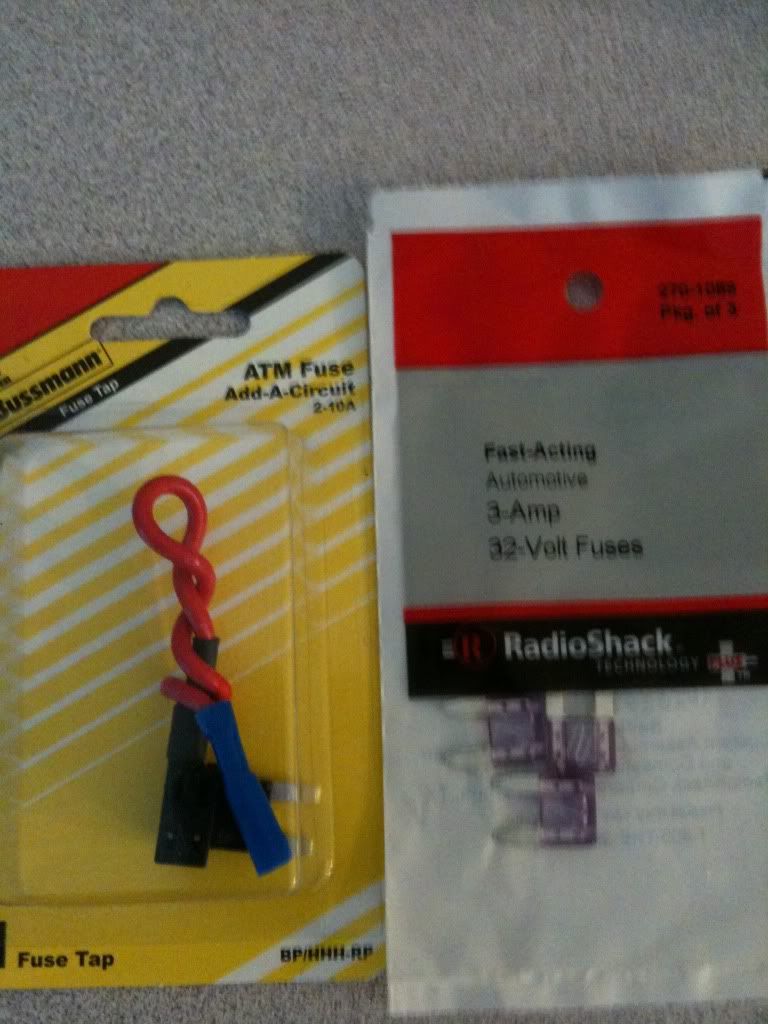  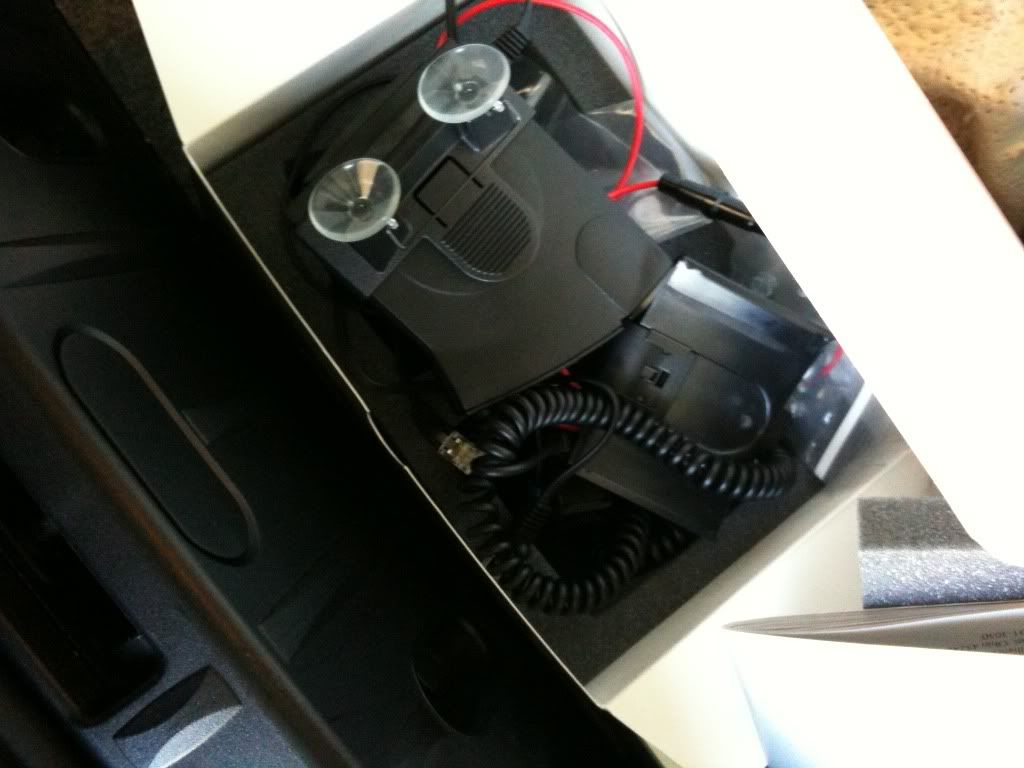 Pop open the mini fuse tap kit, and get the blue wire tap that is included in the V1 kit. Tap bottom of wire as shown. 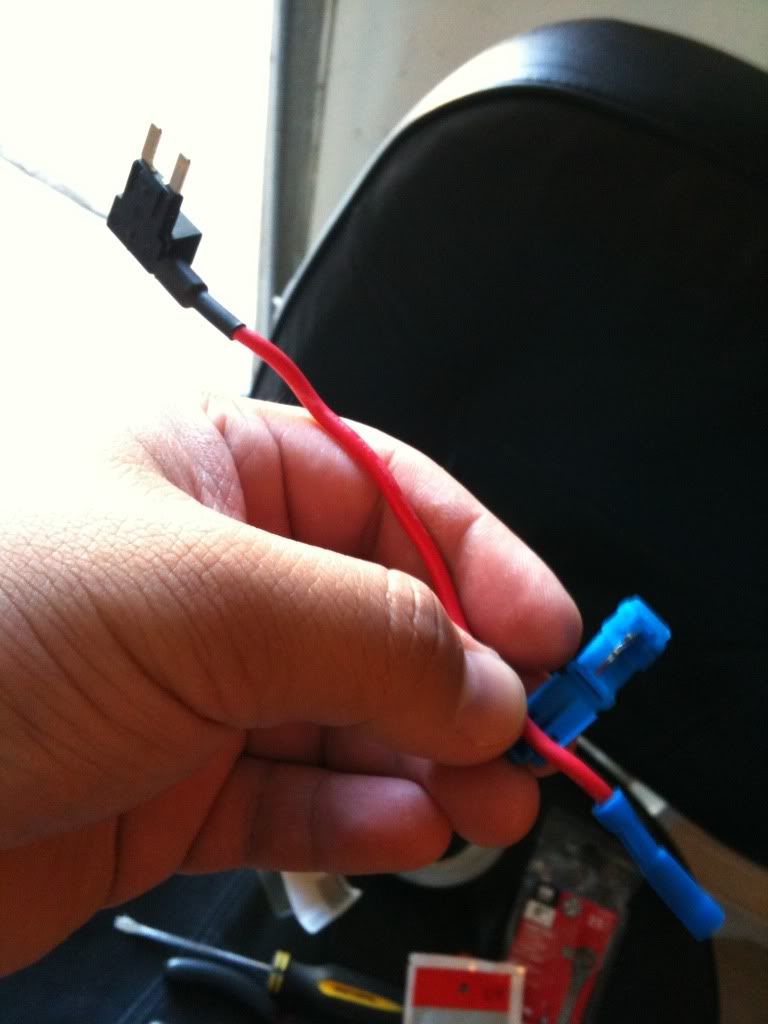 My tap wouldn't go in at all, so I had to be extra persuasive, by means of needle nose pliers. 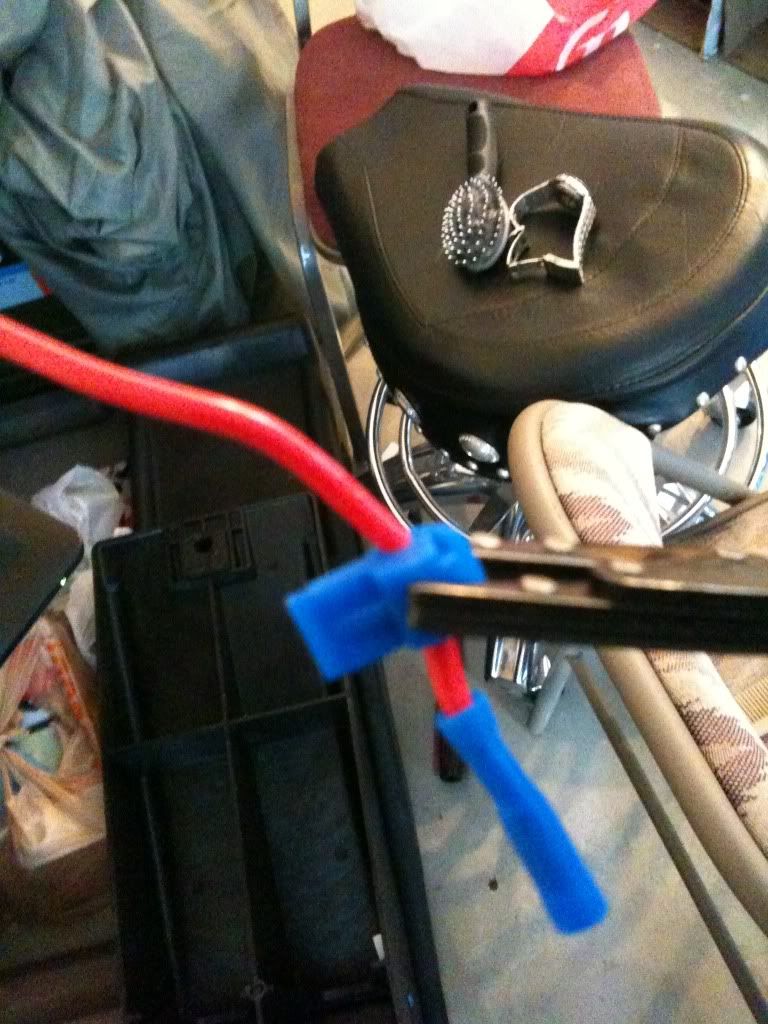 Take the 3-Amp (or lower) fuse, and stick it into the fuse tap. 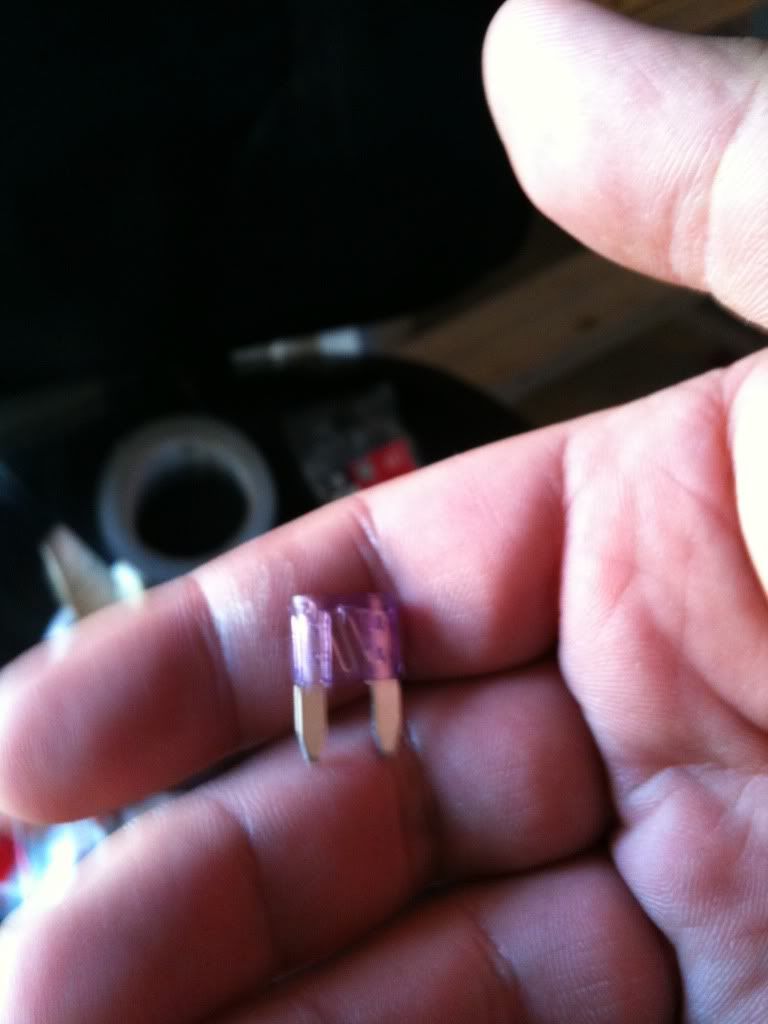 Whole thing should look like this. 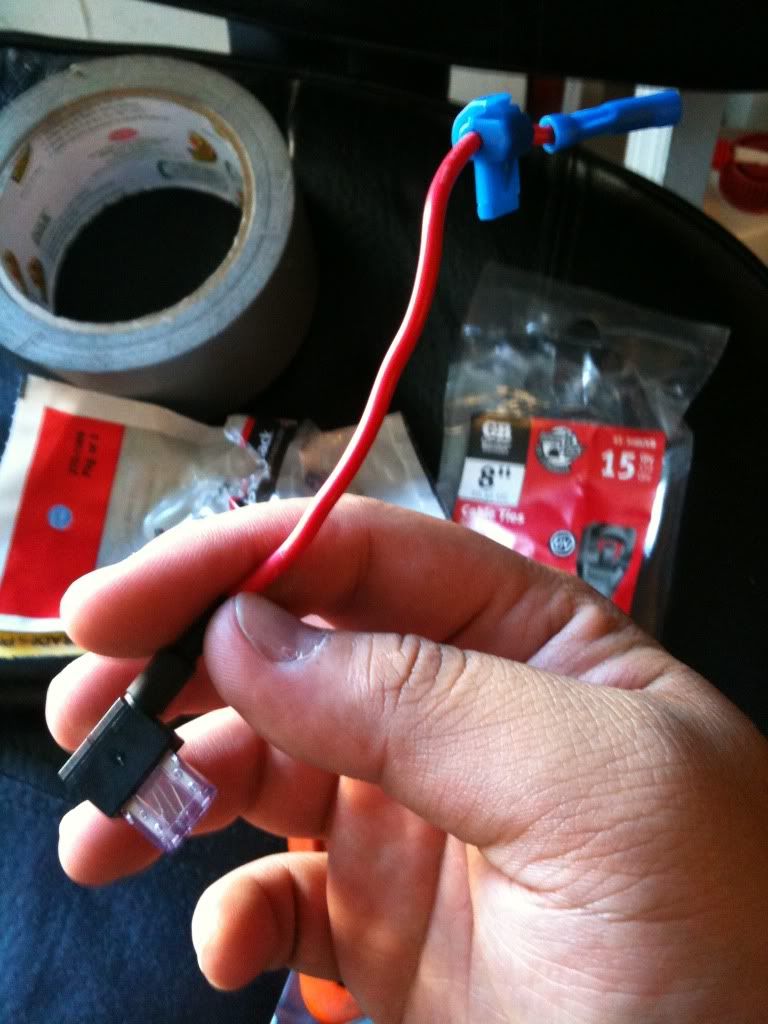 Ok, now clear out your whole glove compartment. See these little knobs in the back of your glove compartment? When they are horizontal, they are locked. Just turn them so that they are vertical, and pull the backing plate out. 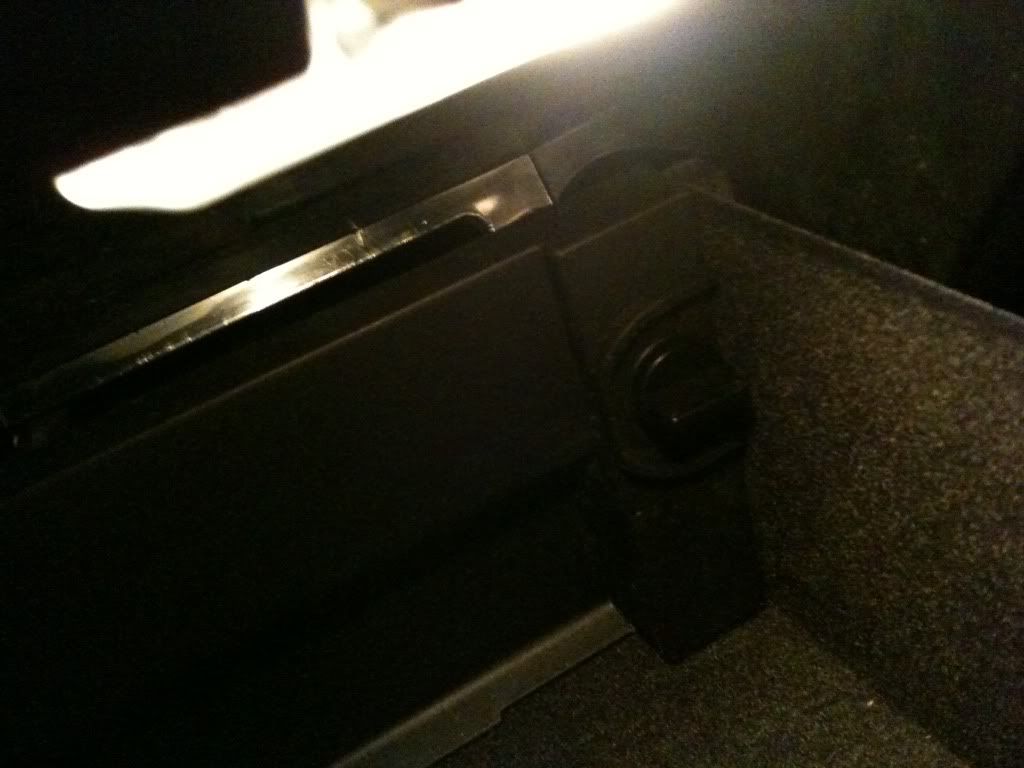 Behind the backing plate, there is a fuse box guide. Use it if you need it. 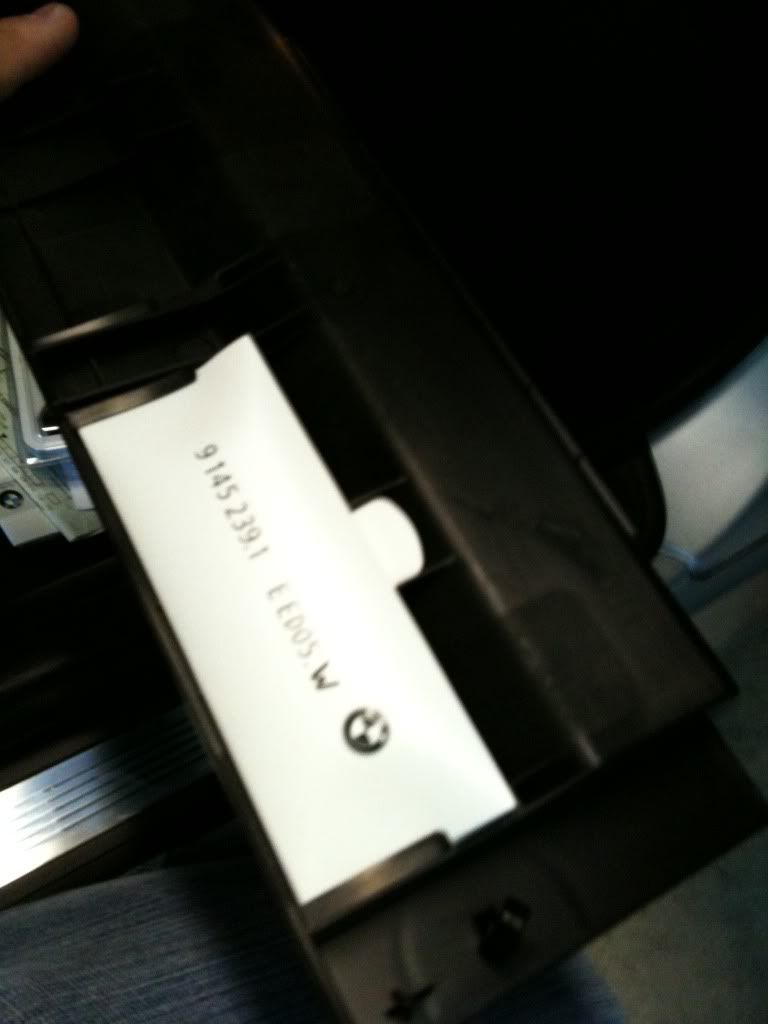  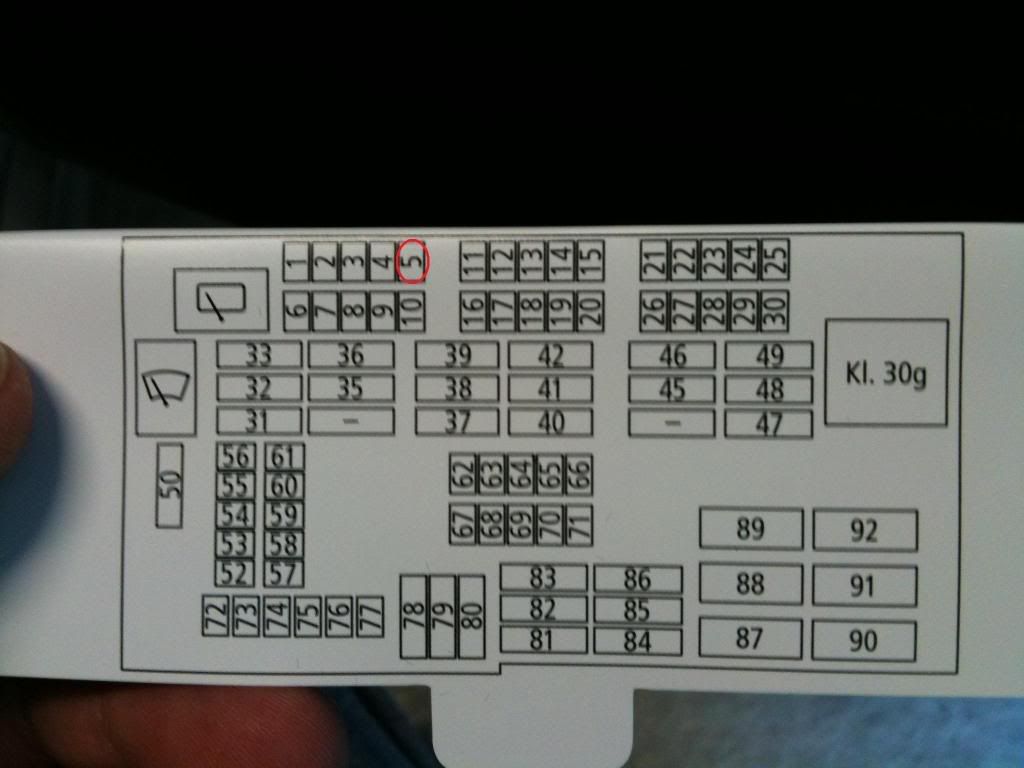 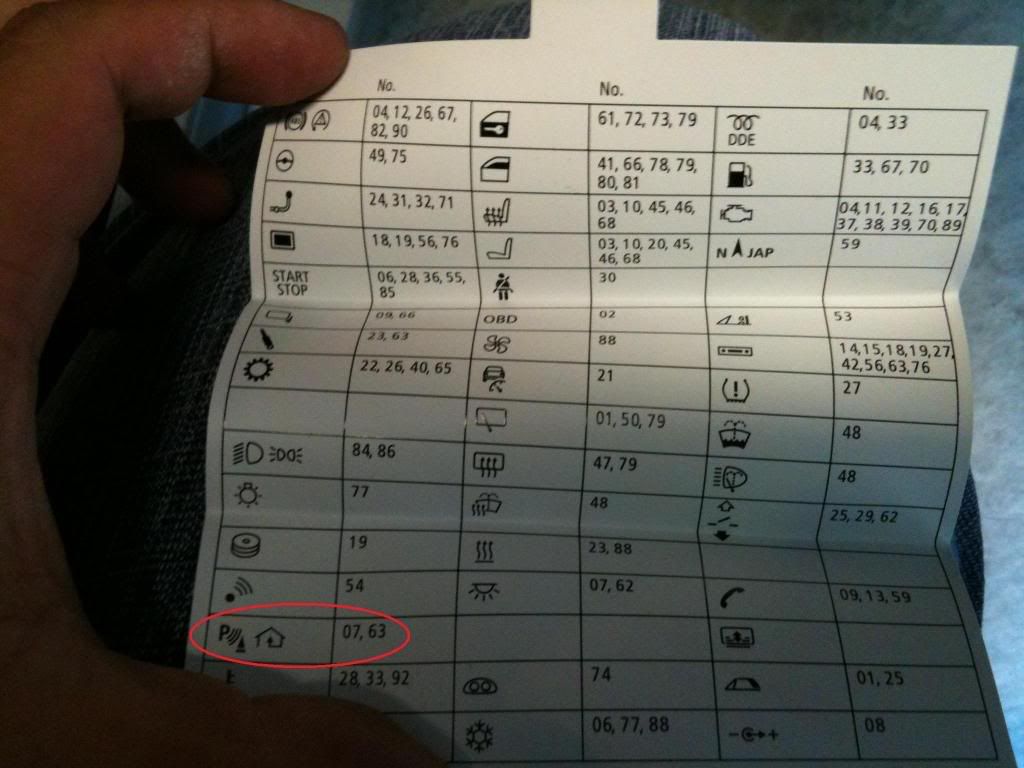 ~*FOR THE MY08/MY11.5 E92 M3*~, fuse slot 5 is unused ignition (circled in red). I found this somewhere on the M3post.com forum, I forget where. TAP INTO SLOT 5. (Best for our purposes, since it's unused, but is still ignition-activated, so doesn't always draw power.) For everyone else, I have no idea, and in that case, you may consider tapping into the slot corresponded with the picture (circled in red in the photo with symbols). It's the OnStar one. Some people have also tapped into the cigarette lighter. Just remember, if you are tapping a slot that is currently in use, put in both your new fuse and the old one, as shown. Obviously, if you're tapping unused ignition slot 5 like me (FOR MY08 E92 M3) you will only need your new 3 Amp fuse, since there isn't any fuse there.  Now take your T-30 Torx wrench (6-point star-shaped one), and loosen this bolt here. DO NOT TAKE IT OUT! It was a HUGE pain in the ass getting it back in. Just loosen it enough to slip your ground (black wire) on the hardwire block behind it, and then tighten it back up. 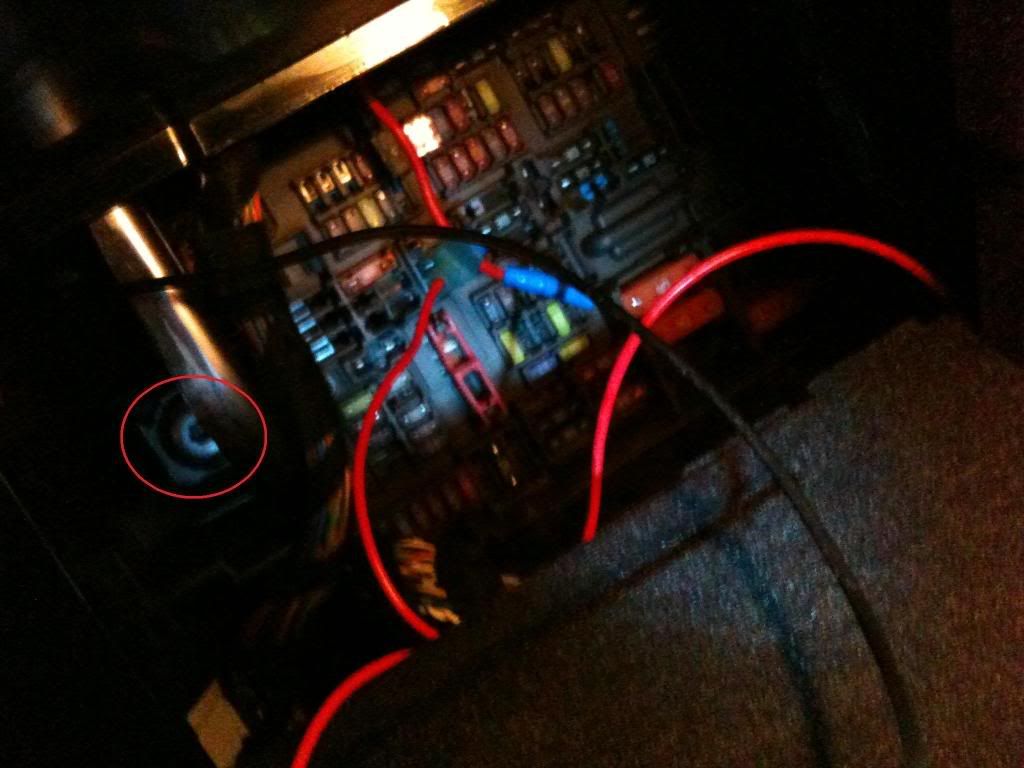 Now, remember that wire tap that we put on the fuse tap? Plug in the red wire on the hardwire block into it, to give it power. (Above photo.) Now, plug in your phone line into the Main Unit slot, and plug the other end into your V1.  With your car off, the unit should NOT BE ON. 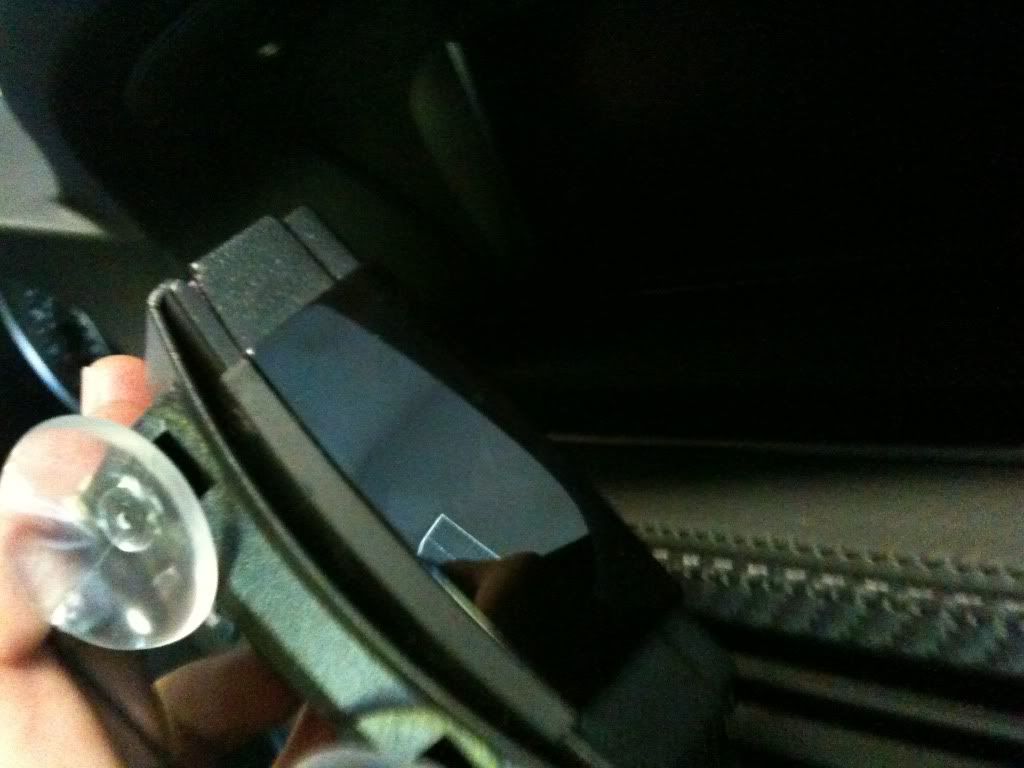 But once you turn on your ignition....voila! We have power. 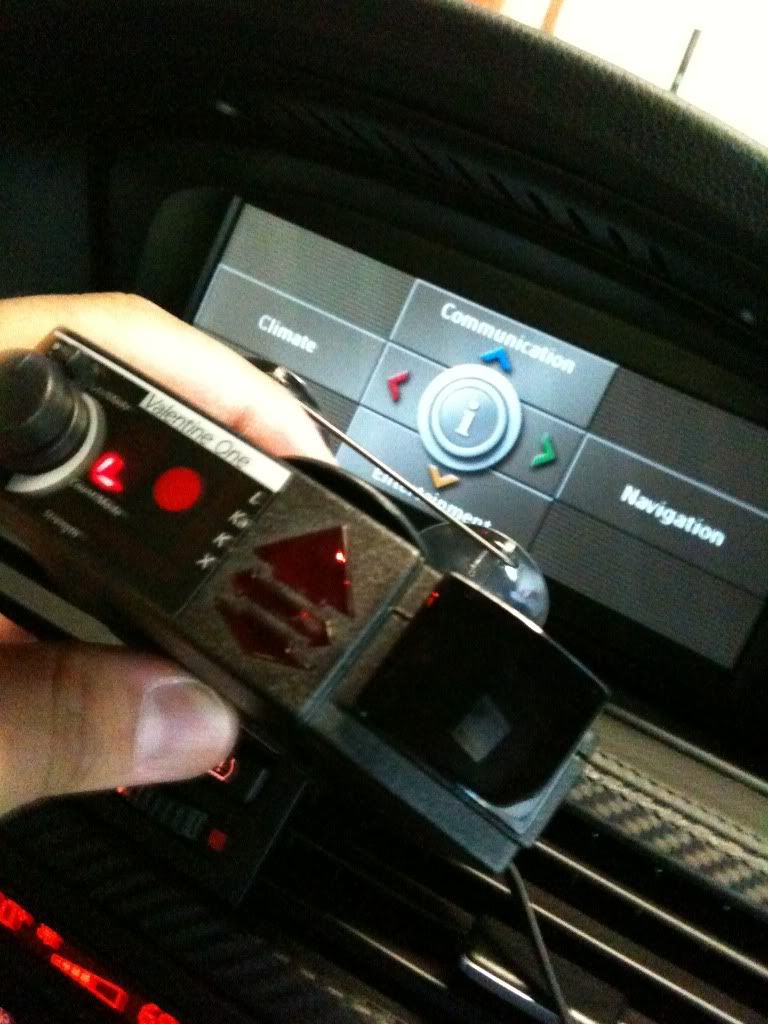 ....Wait, it's not turning on! Oh what did I do wrong? Don't worry, it's probably not a big deal. Go back to your fuse tap, and turn the thing 180 degrees, and plug it back in.... Bam! It should be working now. Yes, up and down direction does matter for the fuse tap. Luckily it wasn't such a big deal, huh? Phew! (Notice the wire is pointing down in this photo now, instead of up like in the previous ones. Also notice that fuse is now facing left, and not right.) 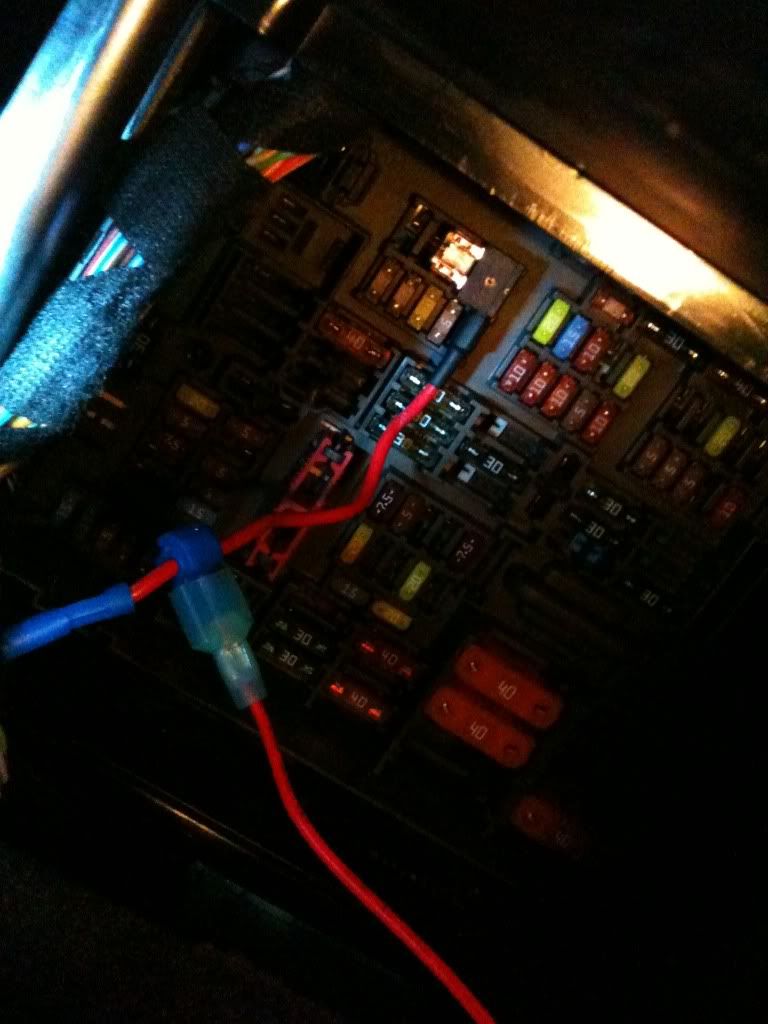 IGNORE THIS PART IF YOU DO NOT HAVE A HIDDEN DISPLAY! Now, plug your other phone line into the Accessory slot of your hardwire block. Then, put the backing plate into your hidden display. I slipped my phone line behind the backing plate, in these little cracks here, to make everything tidy. It'll fit. 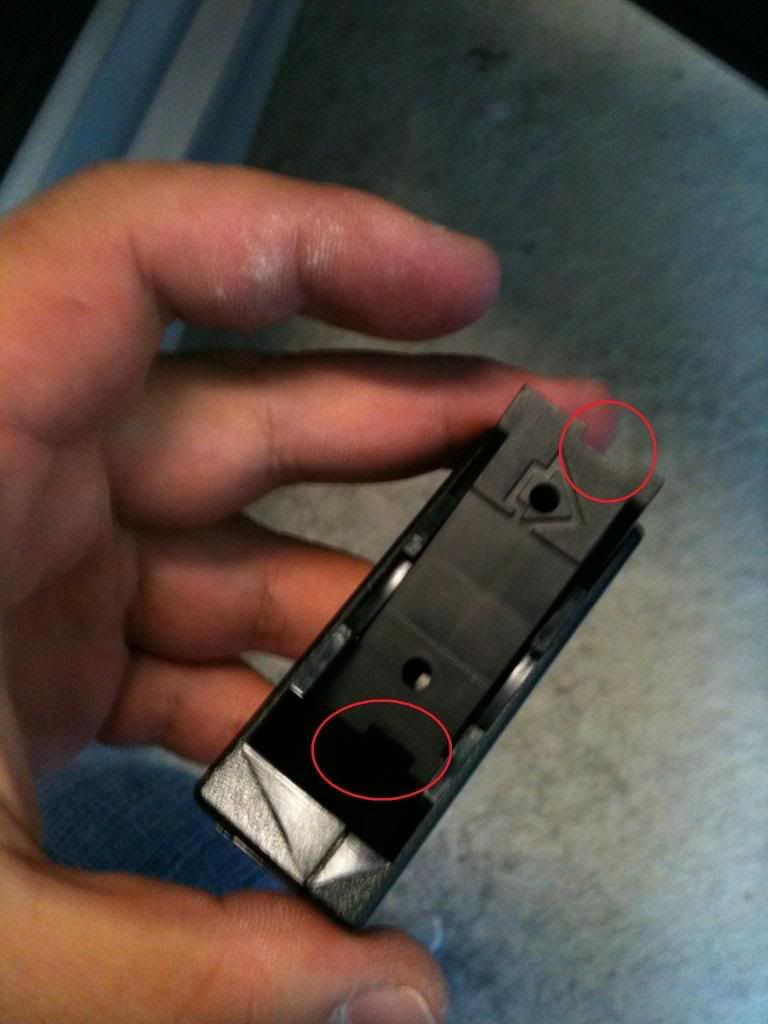 I then shoved the cord inside the cracks of the trim, and ran it to the glove compartment. I placed my hidden display here. It didn't require any velcro or anything, since the pressure of the ashtray lid keeps it from moving around. 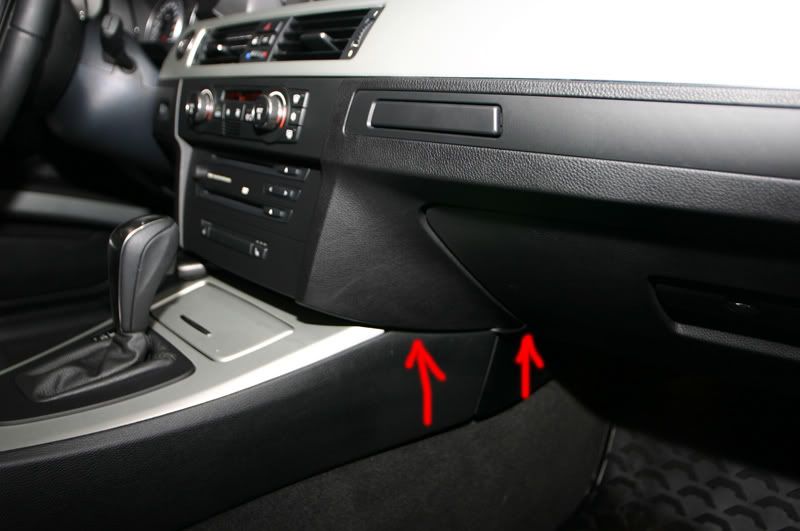 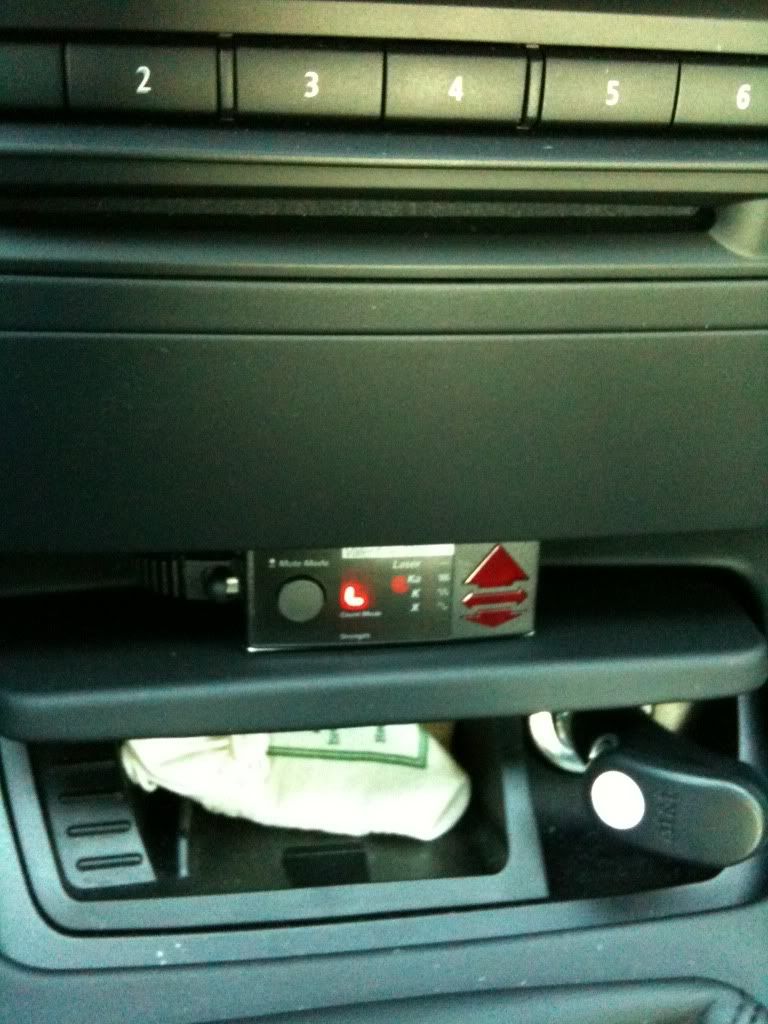 Last edited by LateBraking; 01-14-2011 at 01:10 PM.. |
|
Appreciate
0
|
| 07-16-2010, 11:43 AM | #3 | ||
|
Brigadier General
324
Rep 3,882
Posts |
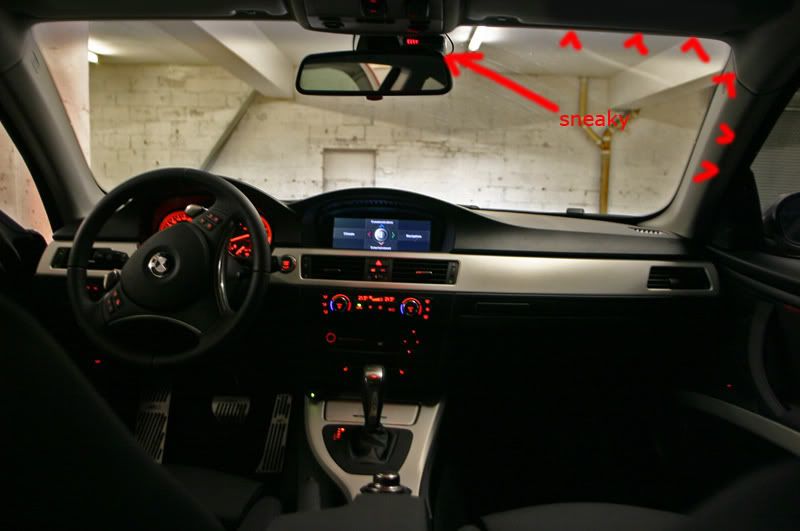
Now, take your V1, and put it where you want it located. Picus has it at a nice location here, out of sight. His photograph shows you exactly what you're going to be doing-sneak your wire along the top (it tucks in) until you reach the side pillar. Give your wire a little bit of slack though, in case you need it.
 Edit: I'm including a quote from ersin. Just because I got slightly lazy near the end shouldn't mean you should too!  Quote:
But anyways, if you're lazy like me, and can't be bothered, (again, I take no responsibility for anything that happens) what I did was CAREFULLY take the flathead screwdriver, and pry back the pillar trim SLIGHTLY, and push the wire behind the trim with the help of the other flathead. 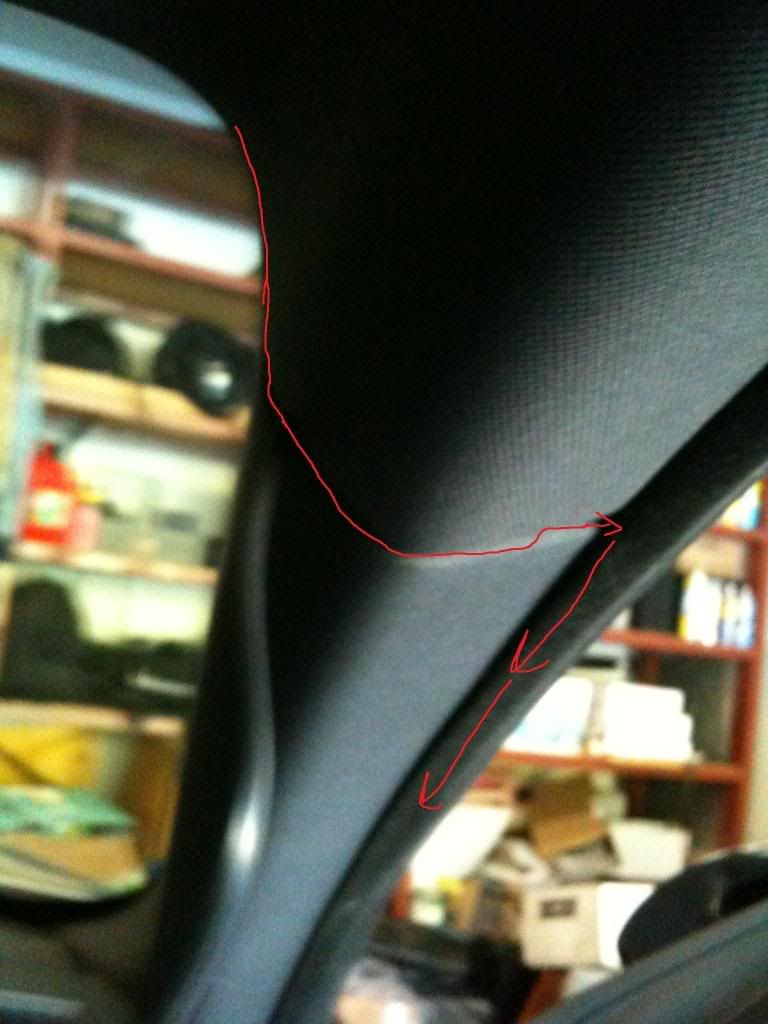 Do this until you reach the lining, and then run the line behind the lining all the way down to the glove compartment. 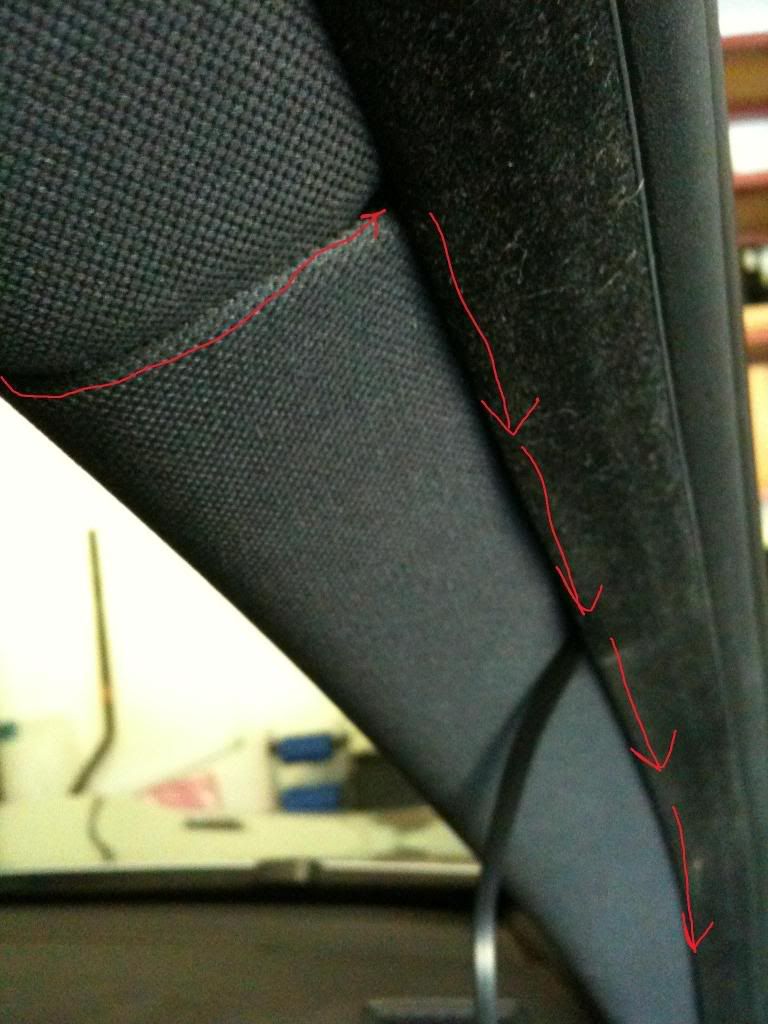  Then sneak it around and inside like I did here, and plug it back into your hardwire block. 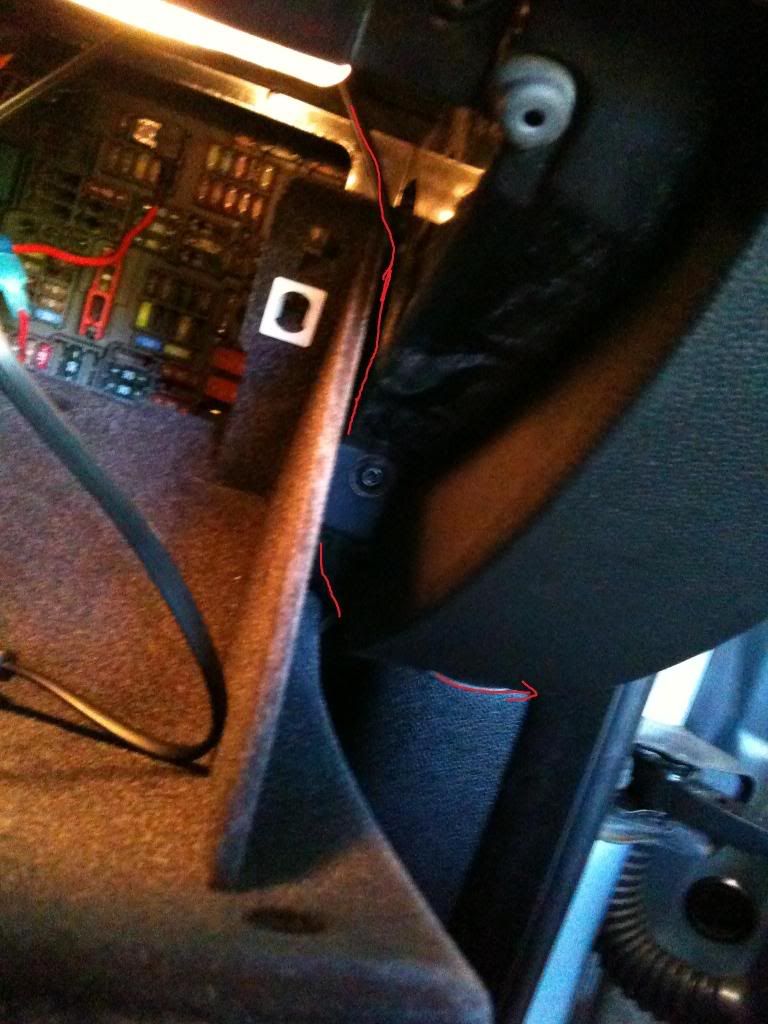 Turn your car on one more time to see if everything works, and then tuck away everything into a corner. Put the backing of your glove compartment back on, and voila! Out of sight, out of mind. Hope this helps! Last edited by LateBraking; 07-16-2010 at 11:49 AM.. |
||
|
Appreciate
0
|
| 07-18-2010, 04:49 PM | #4 |
|
Private First Class
 17
Rep 162
Posts |
Thanks for providing this!! Pictures really help.
One caution, I think. Isn't there an airbag in that pillar that the wire might impact if you just stuff it in? Perhaps better to fully remove the pillar cover and tie the wire to the existing wires, in order to avoid messing up the operation of the airbag. Thanks again for the great guide!
__________________
2010 M3 E92 Space Gray, Black Novillo
2MK,2MT,ZCW,ZPP,ZTP,302,5AC,4MZ,507,6FL,655,752,41 5,A52 |
|
Appreciate
0
|
| 07-18-2010, 11:38 PM | #6 |
|
Lieutenant
 32
Rep 412
Posts |
I completed this DIY over the weekend but ran into a little problem. My detector stays on all the time as opposed to turning off with the rest of the car. I tried slots 5 and 20 (cig lighter) but got the same results. Slot 7 wouln't work b/c a pice of plastic was blocking the fuse tap from seating properly.
Any ideas? |
|
Appreciate
0
|
| 07-19-2010, 10:46 AM | #7 | |||
|
Brigadier General
324
Rep 3,882
Posts |
Quote:
Quote:
Quote:
 |
|||
|
Appreciate
0
|
| 07-21-2010, 06:25 PM | #8 |
|
Major General
890
Rep 9,031
Posts |
You should also mention that the dash endcaps just pops out. It makes running the wire a LOT easier.
If your detector stays on, check on it after about 30 minutes. Many times it'll power down once the car goes into sleep mode. You'll hear it power up again when you unlock the door, or open the door if it's not locked.
__________________
Let me get this straight... You are swapping out parts designed by some of the top engineers in the world because some guys sponsored by a company told you it's "better??" But when you ask the same guy about tracking, "oh no, I have a kid now" or "I just detailed my car." or "i just got new tires."
 |
|
Appreciate
0
|
| 09-13-2010, 02:35 PM | #9 |
|
M - Lover!!!
169
Rep 720
Posts
Drives: E36 M3, E92 M3, F90 M5
Join Date: Jun 2009
Location: Houston, TX
|
Just used this method very EASY done in 1 hour.. also installed concealed display in front of my speedometer.. .. Clean install and saved 300$!!!!
__________________
Current : - 97 E36 Estoril Blu M3 - 11 E92 Space Grey M3C - 21 F90 Aplina White M5C Previous :- 18 F85 Donington Grey X5M - 17 F80 Macau Blu M3 Jahra Edition - |
|
Appreciate
0
|
| 10-28-2010, 10:15 AM | #10 |
|
Private First Class

49
Rep 111
Posts |
Just did this last night not the handiest but it was easy and i was done in under 45 minutes...only problem I ran into was getting the pillar cover back on but it was no big deal. Thanks for posting this really made the install simple!
__________________
Black Sapphire G05 X5 M50i - Sept 2023
'71 Fiat 500L Donnington Grey X3MC - Sold Mineral White F82 M4 - Sold AW E92 M3 - Sold |
|
Appreciate
0
|
| 01-12-2011, 03:09 AM | #11 |
|
Second Lieutenant
39
Rep 216
Posts |
I would recommend against using vampire taps because after a while the connection is bound to come loose and the detector will intermittently shut off or start behaving erractically. I would solder it or wire it to the fuse box the right way.
|
|
Appreciate
0
|
| 01-13-2011, 09:23 AM | #12 |
|
Professional Trophy Husband
25
Rep 150
Posts |
I don't think it matters if you carefully stuff the wire into the A pillar or not. If you notice in the picture from the OP's post, without much slack the wire would continue to rest on top of the lip from the upper pillar molding instead if laying across the airbag. I'm not really sure where someone would zip tie the wire inside that pillar without affecting the airbag performance even more, unless you plan to run the wire behind the airbag.
|
|
Appreciate
0
|
| 01-14-2011, 01:07 PM | #14 | |||
|
Brigadier General
324
Rep 3,882
Posts |
Quote:
 Quote:
|
|||
|
Appreciate
0
|
| 01-19-2011, 08:04 AM | #15 |
|
Brigadier General
3460
Rep 3,995
Posts |
Thanks for the great guide.
Was already planning to install a V1 this week. 
__________________
Current: G82 M4 Comp xDrive // Frozen Deep Grey
Current: 95B.1 Macan Turbo // Dark Blue Metallic |
|
Appreciate
0
|
| 02-11-2011, 04:15 PM | #19 |
|
New Member
1
Rep 21
Posts |
LateBraking,
Great install on the V1! So it's confirmed then that #5 fuse slot is unused ignition slot for MY2011 sept build? Are there any better ways to connect the power from the V1 to the fuse tap, other than the wire tap? I was just wondering, in the event that maybe the V1 could lose power because of a loose connection to the fuse tap due to the wire tap. Either way, thanks for sharing your install! |
|
Appreciate
0
|
| 02-12-2011, 08:12 AM | #20 | |
|
New Member
1
Rep 21
Posts |
Quote:
|
|
|
Appreciate
0
|
| 02-13-2011, 01:51 PM | #21 |
|
Captain

75
Rep 903
Posts
Drives: E90
Join Date: Jul 2010
Location: Houston, TX
|
#5 fuse slot worked like a charm on my 10/2010 build MY11
__________________
2011 E90 M3 6mt AW/Speed Cloth - ZCP, Moonroof, non-iDrive - PCD 12/9/10 Painted reflectors, matte black grills/gills, Deansbimmer Belly Pan, DEI Alarm, Homelink/compass retrofit, Passport MAX2 Hardwire, GP Thunder 8500K, modmy3 LED interior, Dinan Mufflers, HRE P40 19" Satin Charcoal, Michelin PS4S |
|
Appreciate
0
|
Post Reply |
| Bookmarks |
|
|